
Adapting Lessons to Support Students with Severe Disabilities
| Author: | Laura Lewis |
| Level: | Elementary School |
| Content Area: | Special Education Services |
| Author: | Laura Lewis |
| Level: | Elementary School |
| Content Area: | Special Education Services |
Lessons typically require that children keep a journal in some way. For most children this will be a hand written product of some kind. For children who have significant physical difficulties and can’t use their hands to write or type, you can help them keep a journal by using one or more of the following approaches.
If the student has a personal communication device, the device should be the primary means of aided communication. The teacher, teacher assistant, and/or school therapist may need to explore the vocabulary on a device or complete what is called a device walk with the student to locate desired vocabulary. In completing the device walk, the communication partner locates the desired vocabulary items on the device and shows the student how to locate them. This assists the student in accessing the vocabulary more quickly and also gives the teaching staff the opportunity to know if the vocabulary is present. If the needed vocabulary is not present on the device, the staff will then have to decide to either program the target vocabulary onto the student’s device or locate words that could be used to describe the target vocabulary (i.e., if student doesn’t have the word volcano they could use the words hot mountain) so that the student can successfully communicate during the activity.
Example: The student can use the keyboard page or picture communication symbols on their own personal communication device to write journal entries. If the device has the capability, journal entries can be saved in a special notebook section of the device and then printed out. Most devices come with a USB cable or other cable that can plugged into the computer and the student’s journal entries can go directly to a word processing program on the computer and then printed from the computer. A printer can also possibly be connected right to the student’s device.
Eye gaze communication options allow students with severe speech and/or physical disabilities the opportunity to communicate by looking systematically at a desired target. Eye-gaze eliminates difficult motor responses, but requires an attentive communication partner to observe the student’s gaze. Eye gaze is setup by the communication partner providing the student with communication options (i.e., photographs, picture symbols, words, etc.) via a translucent board of some type. The student is asked to look at the choices and then look steadily at the item they want to select, communicate, etc. This is called “holding an eye gaze”. Often times the communication partner will ask the student to look at the communication option then look back at the communication partner in order to clarify that the eye gaze observed was indeed the desired selection. Various products can be utilized to set up an eye gaze communication system. You can make an eye gaze frame from a sheet of Plexiglas or any other clear material (i.e., clear card protectors or baseball card holders). Picture symbols, photographs and/or words written on paper, index cards, or post it notes can be used to provide the communication options around the outside of the communication board. The middle of the board should be cut out and left clear in order for the communication partner to see the student’s eyes and be able to read the eye gaze.
These videos give descriptions of eye gaze and/or show different students using eye gaze in various ways to communicate.
The following website give descriptions of eye gaze boards and their use.
Example: Teacher can show the student pictures that represent possible responses to journal entries, ideas that have been discussed, items from the story reported, etc. and the student can eye gaze to the pictures that they want put into their journal and the assistant or another student can paste pictures student selects into a journal.
A method of communication in which the communication partner identifies (by naming or pointing) the items in the selection set then waits for the student to signal (via a sound or movement) the item he/she wishes to communicate. The following is an example of how to use partner assisted communication:
Basic Partner Assisted Communication can be completed one-by one with items in a linear array. This can be done using objects, pictures, picture communication symbols, words, phrases, or letters of the alphabet.
Advanced Partner Assisted Communication can be completed using a group-item strategy gradually narrowing down the selection. This can be done using objects, pictures, picture communication symbols, words, phrases, or letters of the alphabet.
These videos give examples of how to use partner assisted communication.
These websites provide information about what Partner Assisted Communication is and how to use it with students.
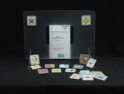
Light tech refers to no-computerized adaptations and supports. When devices or other computer options are not available the teacher can utilize light tech options to support communication, participation and learning. Laminated paper communication boards are one example of light tech options that can meet a student’s communication needs. The picture symbols, magazine photos, photographs, post it notes, word cards, etc. related to the science activity and/or question at hand can be arranged in tables in a word processing document, printed, and laminated for the student. Or the symbols can be cut out into individual cards and mounted on a piece of cardboard, a file folder, or foam core boards to create communication boards. Individual symbols can be attached using Velcro, clothes pins, putty, etc. so that they can be moved, presented individually or exchanged as part of the communication act. Often the teacher will show the student the symbols before asking a question, or explaining how the symbols will be used in the activity. The student can communicate by touching a desired symbol, looking at the symbol or indicating their choice through partner assisted scanning.
Address: Campus Box 7006. Raleigh, NC 27695 Telephone: 919.515.5118 Fax: 919.515.5831 E-Mail: KenanFellows@NCSU.edu