
A Day in the Life: Exploring Biomanufacturing Careers
| Author: | Lori Stroud |
| Level: | Middle School |
| Content Area: | Science, Biotechnology, Physics |
| Author: | Lori Stroud |
| Level: | Middle School |
| Content Area: | Science, Biotechnology, Physics |

|
Part 1: Serial Dilutions of Yeast Broth Equipment and materials for students |
|
| Equipment and notes | Quantity per group (recommend 2-4) |
| □ Test Tube Rack | 1 |
| □ Test Tubes | 4 |
| □ Flask (recommend 1000mL) with water | 1 |
| □ Pipette Pump (10 mL) | 1 |
| □ Pipette (10 mL) | 1 |
| □ Yeast Broth | 1 ml |
| □ water | 50 mL |
| □ Lab Tape | 2 inches |
| Part 1: Serial Dilutions of Yeast Broth Equipment and materials for teacher preparation | |
| Equipment and notes | Quantity |
| □ Baker’s yeast ~Saccharomyces cerevisiae (Red Star® was used when preparing this activity) | 1 gram per student group |
| □ Warm water | 50 mL per student group |
| □ Beaker (500 mL) | 1 |
| □ Microwave or hot plate | 1 |
|
Part 2 and 3: Inoculation of Media with Yeast Cells on Media Equipment/Observation of Cell Colonies Equipment and materials for students |
|
| Equipment and notes | Quantity per group (recommend 2-4) |
| □ Petri dish with YED, YPD or YEPD medium | 1 |
| □ Disposable Loop | 1 |
| □ Lab Coat or Apron | 1 per person |
| □ Safety Glasses | 1 per person |
| □ Safety Gloves | 1 pair per person |
| □ Incubator (optional) | 1 for entire class |
| □ Marking pen | 1 |
| □ 70% Ethanol solution (in spray bottle) | 1-2 for entire classroom use |
|
Part 2: Inoculation of Media with Yeast Cells on Media Equipment and materials for teacher preparation |
|
| Equipment and notes | Quantity |
| □ Petri dishes | 1 per student group |
| □ Magnetic stirrer/hot plate | 1 |
| □ 500-1000mL glass beaker | 1 |
| □ Magnetic stirring bar | 1 |
| □ Distilled/sterile water | 500 mL per 15 plates |
| □ YEPD agar or equivalent recipe | 35 grams per 15 plates |
| □ Scale | 1 |
| □ Weigh Boat | 1 |
Students should be familiar with the Serial Dilutions technique prior to conducting this activity. If they are not, conduct the Pre Lab Serial Dilutions Exercise first.
Review the concept that serial dilutions reduce the concentration of the sample in small steps or fractions. If the yeast broth was directly placed on the growth medium in the petri dish, the growth would be too great to measure and there would be very little difference from group to group. This step will ensure a more accurate result. Also, diluting the sample will allow groups to see individual colonies of yeast cells that grow on the media.
If this is the students’ first experience with media, perform a demonstration on proper handling of the materials and aseptic technique. Set up an area in the class room that is a “clean zone.” Spray the area with 70% ethanol and wipe with paper towels. Explain to students that the techniques being demonstrated will help to ensure that the only cells that grow on the petri dishes are yeast. Being careless in handling and inoculating the dishes could result in contaminating them with germs from the classroom. Remind students to keep the plates closed except when inoculating them. Also, review the proper streak method and have students practice the method, using their pencils, on their lab sheets. Wearing gloves will help reduce contamination from their hands. Have a labeled “biohazard” bag for disposal of the loops.
Recommended streak pattern:

The teacher can use the Power Point to review the pre lab definitions that the students have on their lab sheet.
Students will follow the directions on the lab sheet to perform the serial dilutions for their sample. Be sure students mix the samples thoroughly in between each step. Mixing can be done with a vortex or by pipetting the contents of the tube up and down several times.
Summary of the Serial Dilutions Student Directions:
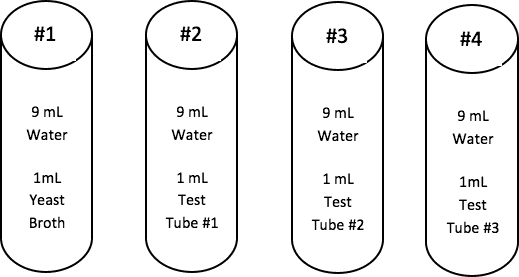
The student directions call for groups to use the fourth serial dilution in order to inoculate the dishes. If there is sufficient time and materials, groups could inoculate dishes using samples from the other dilutions. This will allow students to see how the greater the dilution, the easier it is to count the cell colonies. The less the dilution, the greater the growth, but it is much more difficult to count colonies. It will also allow more students to experience inoculating a plate.
The teacher will need to decide if groups will come to a specific “clean area” in the classroom in order to inoculate or if each group will be responsible for sanitizing and preparing their own work area. A “biohazard” bag should be used to dispose of loops.
Be sure that students mix the tubes well prior drawing the samples to inoculate the plates.
Plates can be stored at room temperature (growth will take approximately 48 hours) or placed in an incubator at 30° Celsius (growth will take approximately 24 hours).
When the appropriate amount of time has elapsed for growth to occur, return the plates to the student groups for them to complete the lab analysis portion of their answer sheet and to conduct Activity 4: Making a Wet Mount Slide and Observing Yeast Cells under the Microscope.
For the analysis portion of the student answer sheet, the students will need a black marking pen in order to count their yeast cell colonies. Students should turn their dishes over and use the marking pen to mark and count their colonies.
Address: Campus Box 7006. Raleigh, NC 27695 Telephone: 919.515.5118 Fax: 919.515.5831 E-Mail: KenanFellows@NCSU.edu