Kenan Fellows Program Logo and page header graphic

A Day in the Life: Exploring Biomanufacturing Careers

Activity 3: Lab: Operate and Monitor a Mini Bioreactor

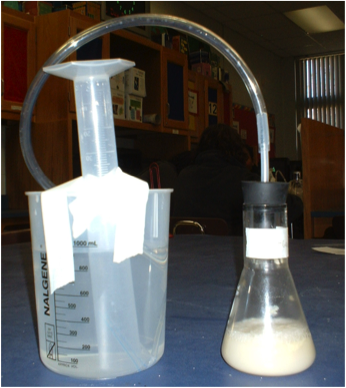
Mini Bioreactor Equipment and materials for students

Equipment and notes Quantity per group (recommend 2-4)
□ 250 mL Flask (shake) 1
□ 1000 mL Flask 1
□ #7 One Hole Stopper 1
□ Tubing (6 inches of polypropylene that is ¼” outside diameter and 20 inches of silicone that is 3/16” inside diameter) 1
□ 100 mL Graduated Cylinder (polypropylene) 1
□ 1000 mL Beaker (polypropylene) 1
□ Timer (optional) 1
□ Thermometer (if using hot plate to heat water) 1
□ Hot plate (optional) 1
□ Hot mitts (if using hot plate) 1
□ Baker’s yeast ~Saccharomyces cerevisiae (Red Star® was used when preparing this activity) 2.1 g
□ Sugar (Sugar in the Raw™ was used when preparing this activity) Assign amount using variables chart
□ Soy Flour Assign amount using variables chart
□ Lab tape 1 roll
□ Weigh boats 3
□ Water 700 mL in a 1000 mL flask

Mini Bioreactor Equipment and materials for instructor preparation

Equipment and notes Quantity
□ Microwave (central access for students to use to warm water if not using hot plates) 1
□ scales and or balances 1-3

Preparation instructions

  1. For each group, connect the 3 inches of polypropylene tubing to the silicone tubing (20 inch piece). This 3 inch piece of polypropylene tubing will be inserted into the rubber stopper.

    In addition, a curved piece of polypropylene tubing needs to be attached to the other end of the silicone tubing. A large bendable straw can be used for this, or the remaining 3 inch piece of polypropylene tubing can be heated and bent. This piece of tubing will be inserted into the graduated cylinder during the experiment.

  2. The teacher will need to decide how the students will access the consumable supplies and scales. If time is a concern, the teacher may wish to pre-measure the supplies and have them with the equipment for the group. Another option is to have students pre-measure their materials a day prior to assembling the bioreactor. If students are going to measure the materials themselves, a “weighing station” can be set up in the room to allow for closer monitoring by the teacher.
  3. This lab activity allows students to explore experimental design and analyze numerous amounts of data. The teacher will need to decide how each group will be assigned the amount of sugar and flour they will use in their bioreactor. Below is a suggestion of how to alter the nutritional variables:

    Group

    Carbon (Sugar)

    Nitrogen (Flour)

    1 Neutral (1.6g) Neutral (1 g)
    2 -100% (0 g) -100% (0 g)
    3 Neutral (1.6 g) -100% (0 g)
    4 -100% (0 g) Neutral (1 g)
    5 + 50 % (2.4 g) +50% (1.5g)
    6 + 50 % (2.4 g) -50% (.5g)
    7 -50% (.8 g) -50% (.5g)
    8 -50% (.8 g) +50% (1.5g)
    9 Neutral (1.6g) +50% (1.5g)
    10 +50% (1.5g) -50% (.5g)
    11 + 50 % (2.4 g) Neutral (1 g)
    12 -50% (.8 g) Neutral (1 g)

    To gain greater data, these percentages can be altered even more. If a teacher has multiple classes, the data can be shared from class to class. The teacher will need to assign the appropriate amounts of sugar and flour to the groups and direct them to record those amounts on their batch record prior to beginning the lab.

  4. After analyzing the results from all the groups, students should be able to answer these essential questions:
    How does carbon dioxide output correlate to cell growth?
    What are the most effective sources of nitrogen and carbon when growing yeast cells?
    What nutritional factor plays the greatest role in yeast fermentation?
  5. Included with this lesson is an Excel spreadsheet file that students can access to input data. The spreadsheet creates graphs of the growth rate of the yeast.

Class Demonstration

  • The teacher may wish to demonstrate the proper procedures for measuring the consumables and setting up the bioreactor apparatus. It is advised to use polypropylene beakers and graduated cylinders for the bioreactors. Students will be inverting the equipment and there is a risk of them being dropped or tipped. Here is a picture of a correctly assembled bioreactor:

test tube image

Executing the Lab

  1. After lab equipment and supplies are secured, prepare the laboratory handouts for the students. The lab handout is design to mimic a batch record that is used in the biomanufacturing industry. Review the components of the record, including initials and dates. Explain to students that this type of documentation is one of many elements of GMP- Good Manufacturing Practice. This quality standard is used in FDA regulated pharmaceutical plants. Be sure to assign nutritional variables to each group and have them record them in their batch record in the table Materials Used.
  2. The data table for recording the fermentation rate in the bioreactor requires students to collect data every minute for fifteen minutes after their bioreactor has been fully assembled. Groups can select a member to serve as a timer, or each group can use a stop watch or clock to measure the time.
  3. After the experiments are completed, explain procedures for clean up and return of equipment and supplies. 

Laboratory Analysis/Assessment

  1. Students will observe and record data during the experiment, using the batch record worksheet.
  2. The teacher will monitor equipment usage and data collection during the lab and correct any mistakes.
  3. Results of this experiment can be analyzed using spreadsheets. At the conclusion of the lab, students can enter data into the Excel spreadsheet file in order to create graphs which show the growth patterns of the yeast based on the variables assigned to the groups. If needed, secure time in the computer lab. The results can also be placed on a large piece of bulletin board paper. Each group can plot their data using different colored stickers or markers. This type of chart will allow all students to see all the results in one location.
  4. After the graphs are completed, each group will write a summary of their results and present their findings to the class in the form of a Power Point presentation or poster.

Critical vocabulary

  1. Biomanufacturing
  2. Bioreactor
  3. Carbon
  4. Carbon dioxide
  5. Fermentation
  6. Nitrogen
  7. Yeast